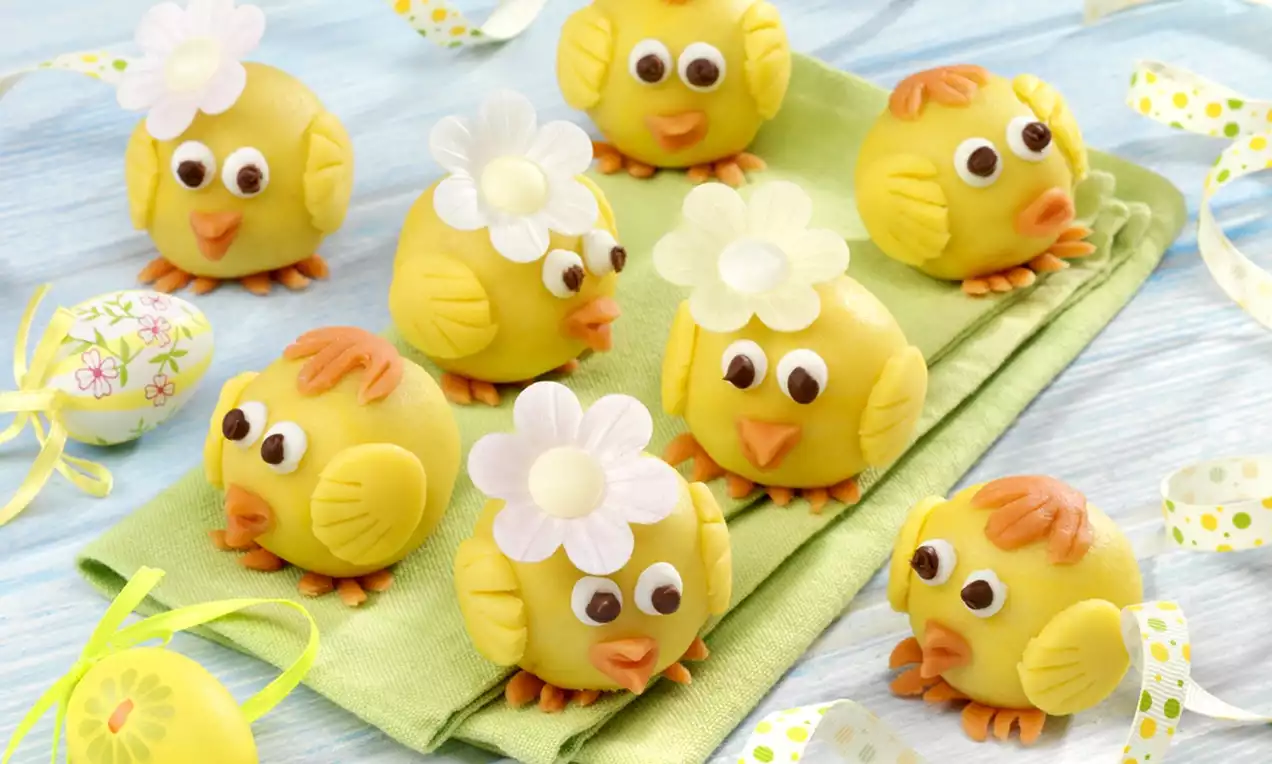
Marzipan Chirpy Chick Truffles
Ingredients
Preparation:
Break the Milk Chocolate into a heatproof bowl and place over a saucepan of barely simmering water to melt. Remove from the water and leave to cool for 10 minutes. Put 5ml (1 tsp) melted chocolate into a small bowl and set aside for decoration.
Stir the cake crumbs and jam into the melted chocolate until well mixed. Cover and chill for about 30 minutes until firm enough to shape.
Meanwhile, prepare the decoration. Lightly dust the work surface with icing sugar. Cut off a 25g (1oz) piece of the Marzipan and wrap in cling film.
Take the remaining portion of Marzipan, flatten it slightly and add 5 drops of Yellow Gel Food Colour. Fold the Marzipan over the Gel Food Colour to enclose it and carefully knead it into the Marzipan until evenly mixed. Continue adding Gel Food Colour, 5 drops at a time, until you achieve the desired colour. Wrap in cling film to prevent it from drying out. Repeat the process to colour the 25g (1 1oz) piece with Orange Gel Food Colour. As a guide, you will require about 70 drops Yellow, and 40 drops of Orange to achieve vibrant shades.
Divide the truffle mixture into 8 equal portions. From into balls and place on a plate lined with baking parchment. Cover and chill for a further 30 minutes until firm.
Cut off a 25g (1oz) piece of yellow Marzipan and wrap in cling film. Divide the remaining yellow marzipan into 8 pieces. Working on one portion at a time, flatten into a circle about 8cm (3 ¼ inch) diameter and lay a chocolate truffle ball in the centre. Draw up the edges of the circle to enclose the truffle, pinching the top together to completely cover. Roll the marzipan ball carefully in your hands to smooth it. Place on a board lined with baking parchment whilst you cover the remaining truffles.
When you have made 8 yellow balls, form the reserved piece of yellow Marzipan into 8 pairs of wings and secure on the sides of each ball using a little water if necessary.
Form the orange Marzipan into beaks and feet and gently press onto the balls. Make 4 feathery hair shapes for the heads of 4 chicks, using the image as a guide, and press onto the top of the chicks. Gently press 4 Wafer Daisies on to the tops of the remaining 4 chicks.
Pipe eyes using the Designer Icing. Re-melt the reserved Milk Chocolate and paint small dots on the Designer Icing to finish the eyes. The chicks are ready to serve and enjoy!
Related Recipes

Cupcake and Fairy Cake Recipes
Marshmallow Spider Web Cupcakes

Cupcake and Fairy Cake Recipes
Mint Choc Chip Cupcakes

Cupcake and Fairy Cake Recipes